

Torch-on roof repair in Vancouver: what affects the cost
A roof bubble doesn’t automatically mean a full replacement: repair costs depend on what’s happening beneath the membrane and how far the damage extends. For torch-on roof bubbling repair in Vancouver, key factors include the size of the affected area, moisture under the membrane, the condition of nearby seams and flashing, and access around drains or rooftop equipment. The price depends on the case and is given after a quote request.
It’s understandable to focus on the visible bubble, but it may be only one clue to the roof’s condition. Bubbles, leaks, loose seams, flashing problems, and general wear can all affect the scope of a repair. The surrounding roof also matters: checking it helps distinguish a localized fix from more extensive work and identify what’s needed to protect the building.
Key Takeaways
• A roof bubble is a sign to investigate, not a spot to walk on or puncture; damage can let water beneath the membrane.
• Repair scope depends on what’s affected below the visible surface, as well as the condition of nearby seams, flashing and drainage points.
• Leaks may show up far from their entry point, so tracing water back to its source matters when assessing a flat or low-slope roof.
• Loose seams, membrane wear and persistent ponding can point to different repair needs; identifying the cause helps avoid treating only the symptom.
• A localized repair may suit an isolated defect, while widespread damage or recurring leaks can call for a broader assessment of the roof.
1. What Do Blisters and Bubbles Mean?
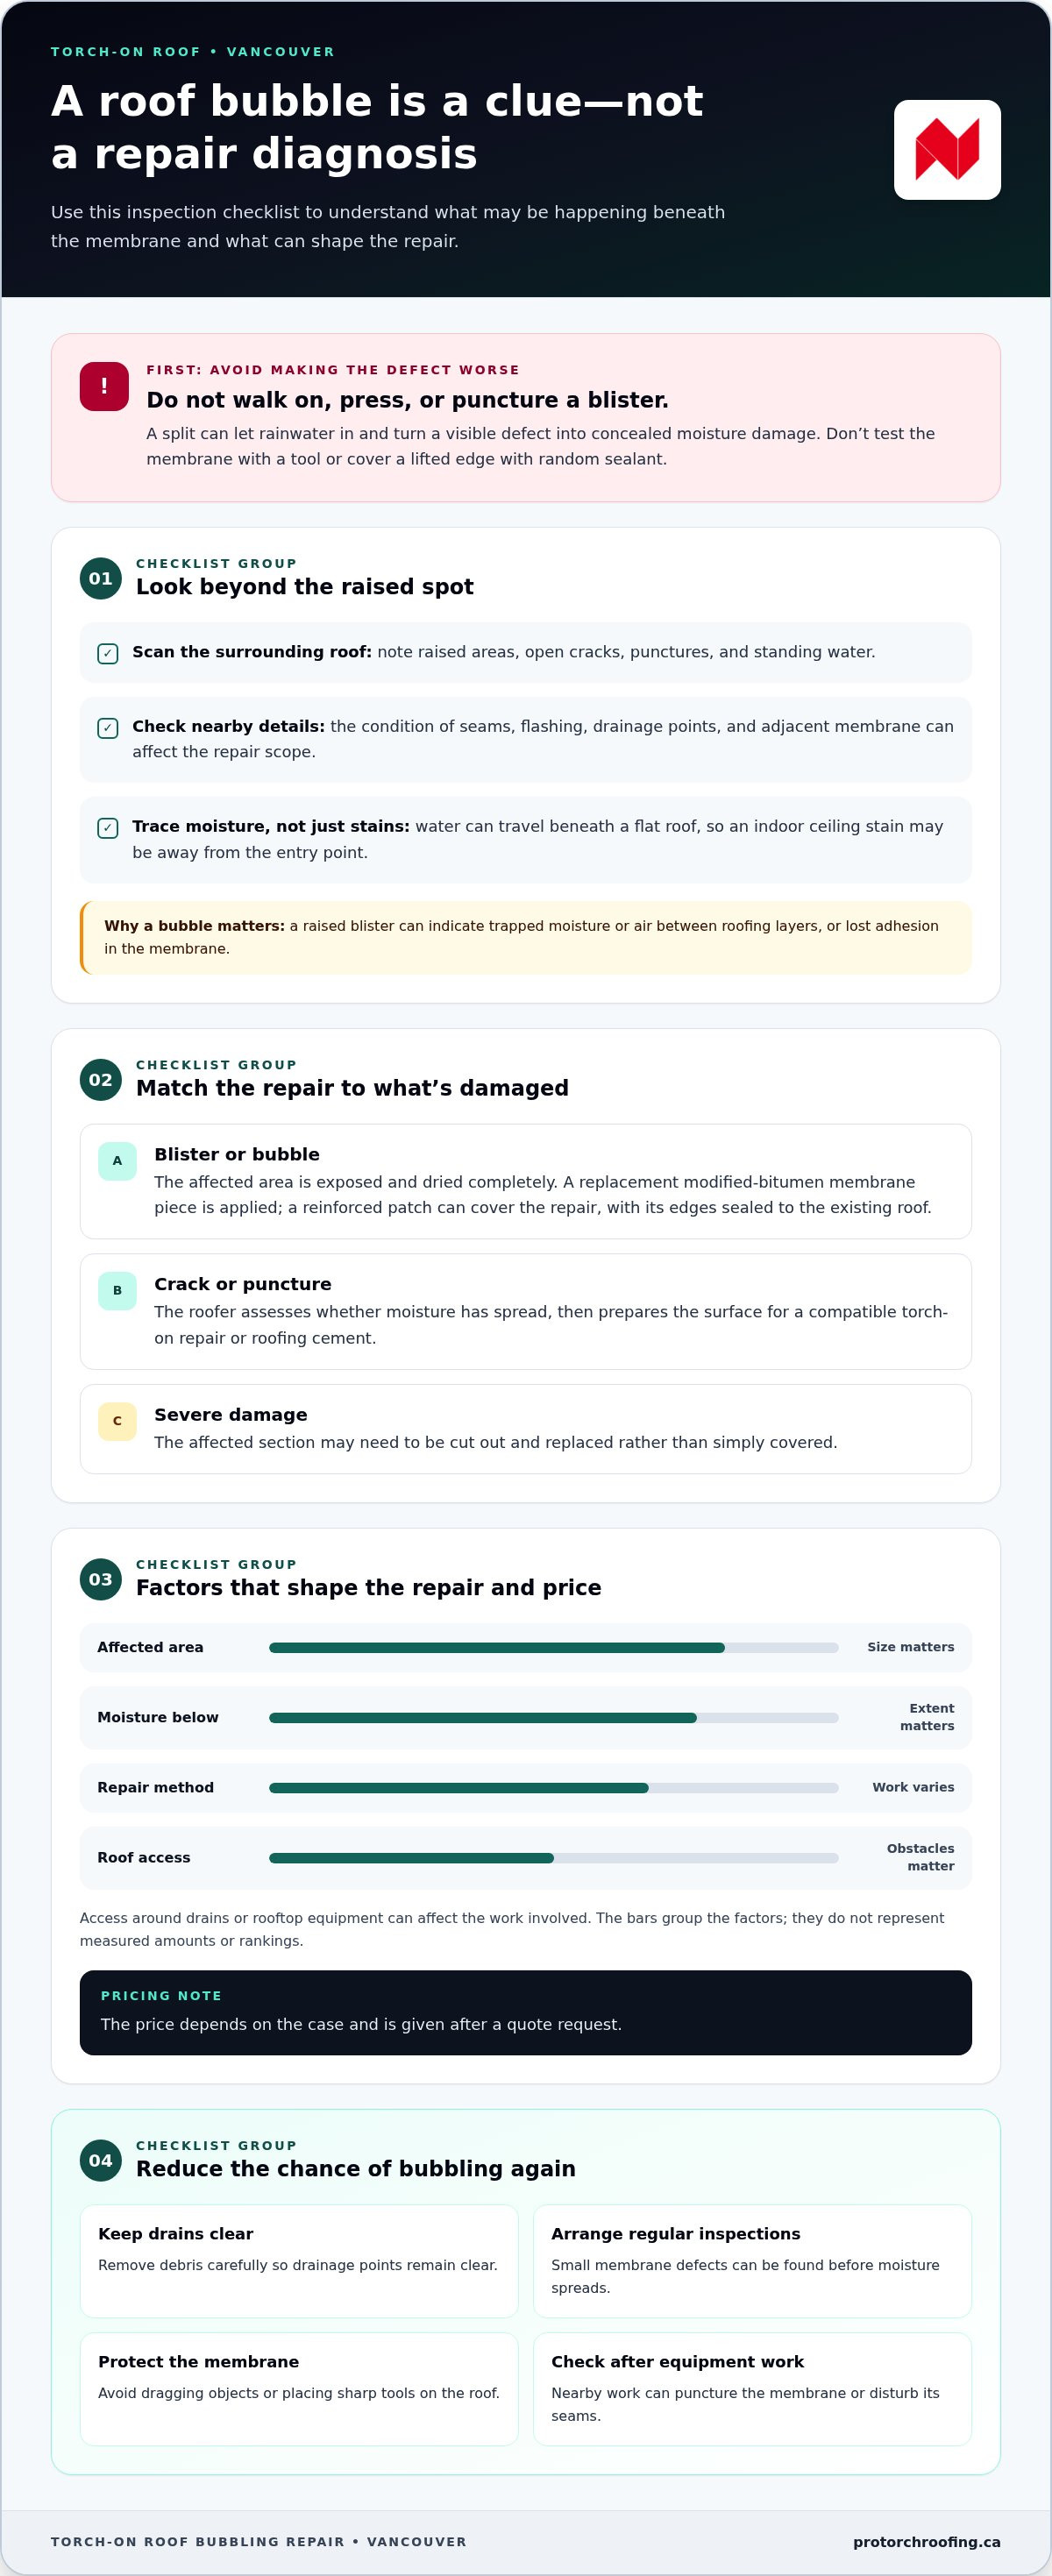
A raised blister or bubble can indicate trapped moisture or air between roofing layers. In torch-on systems, the membrane layers form a waterproof surface, so a raised area may signal lost adhesion. Vancouver’s wet weather makes damaged areas worth assessing before water finds a path through cracks or seams. Don’t walk on, press, or puncture a blister. A split can let rainwater in and turn a visible defect into concealed moisture damage.
Look across the roof for raised spots, open cracks, punctures, and standing water, but don’t test the membrane with a tool. Sharp objects, dropped tools, construction debris, equipment work, heavy foot traffic, and dragged objects can puncture torch-on roofing. The puncture may be small even when water has reached the layers below. On a flat roof, water can travel beneath the surface before a leak appears indoors, so a ceiling stain may not mark the entry point.
Repair depends on the defect and the condition of the surrounding membrane. For a blister, a roofing specialist first exposes and dries the affected area completely, then applies a replacement modified-bitumen membrane piece. A reinforced patch can cover the repair area, with its edges sealed to the existing roof. For a crack or puncture, the roofer assesses whether moisture has spread and prepares the surface for a compatible torch-on repair or roofing cement. Severe damage may require cutting out and replacing the affected section, rather than covering it.
To help prevent torch-on roofing from bubbling again, keep roof drains clear, remove debris carefully, and arrange regular inspections so small membrane defects are found before moisture spreads. Companies specializing in roof care, such as UEC Roofing, emphasize that routine tune-ups and timely leak repairs can keep low-slope membranes functioning properly for years. Avoid dragging objects or placing sharp tools on the roof, and have the membrane checked after nearby equipment work.
When choosing a torch-on roofing contractor in Vancouver, look for experience assessing and repairing membranes, including blisters, punctures, and seams. A useful assessment identifies the damage, checks the surrounding layers, and explains why the proposed repair suits the roof’s condition.
The quoted price depends on the case and is given after a quote request. The affected area’s size, moisture beneath the membrane, repair method, and access around drains or equipment all influence the work involved. For torch-on roof bubbling repair in Vancouver, addressing the underlying cause helps determine whether a localized patch can restore protection or the damaged section needs broader repair.
2. Inspecting flashing and roof penetrations
Flashing protects the points where a roof membrane meets walls, parapets, drains, scuppers, skylights, and equipment curbs. These transitions interrupt the broad, continuous surface, so a leak can start at a small gap or weakened connection. During an inspection, a roofer checks for lifted edges, open joints, cracks, loose metal, and sealant that has separated from the surrounding membrane. An indoor stain may appear away from the entry point, so the inspection follows the roof system rather than stopping above the stain.
Pay close attention to rooftop vents and HVAC units. Work around equipment can scrape or puncture the membrane, disturb flashing, or loosen a connection without leaving an obvious mark from the ground. After construction or equipment work, the surrounding roof area deserves a close look. A contractor checks where the modified-bitumen membrane meets the curb, then follows the seam around its perimeter for gaps or exposed edges. Vancouver’s wet climate makes sound connections important because rain can enter beneath a weakened edge.
Don’t press down a lifted membrane edge or cover it with random sealant. That can hide the opening while leaving moisture trapped underneath. A roofer assesses why the edge lifted and whether water has travelled beneath it, then determines how to restore the connection. Depending on the materials and damage, repair may involve preparing the surface, re-securing or replacing affected membrane, and sealing the transition with compatible components. Flashing must direct water away from the joint, not create a pocket where it can collect.
Drain and scupper details also affect the repair scope. A Vancouver estimate should identify the work required at drains, scuppers, perimeters, walls, parapets, skylights, and equipment curbs. That detail helps distinguish a single failed connection from several vulnerable transitions. Where flashing meets a torch-on membrane, the materials and installation method need to work together. Manufacturer-approved adhesive is appropriate for resealing separated seams or perimeter joints when the system calls for it; a generic sealant may not bond properly to modified-bitumen roofing.
Maintenance helps catch small changes before water enters the building. Look for loose metal, cracked sealant, debris blocking a drain, or a dark line where flashing meets the membrane. Don’t climb onto a roof if access is unsafe; a professional can inspect those details directly. Vancouver property owners are advised to arrange inspections in September or October before the heaviest rains, with a further check in late winter for post-storm damage. For roof maintenance or a repair assessment, you can request a roof assessment focused on flashing and membrane connections.
3. Loose membrane seams and poor adhesion
Seams join membrane sheets, so a weak bond creates a direct path beneath the roofing system. On a torch-on roof, modified-bitumen sheets are heated and bonded in layers. If a seam lifts or separates, rain can enter underneath and travel beyond the visible opening. Moisture may spread beneath the surrounding membrane before a ceiling stain appears. An open seam is more than a surface blemish: its length, location, and nearby membrane condition all affect the repair scope.
Look for a lifted edge, a narrow gap between sheets, or a seam that no longer lies flat. A dark line or damp area indoors can indicate water entry, but it may not be directly below the opening. Check the roof around drains, perimeters, and transitions, where seams meet other details. Don’t pull at a loose edge or apply household sealant. That can enlarge the separation or conceal moisture that still needs assessment.
Wind can put extra stress on weak or previously loose sections. Standing water can also keep moisture against a vulnerable seam, while blocked drains may slow runoff. These conditions don’t prove a seam has failed, but they make its location and surrounding surface important inspection points. A roofer checks whether the bond has separated, whether the membrane is cracked, and whether water has affected the layers below. The cause matters: simply covering the opening may leave the original weakness in place.
To repair a loose torch-on seam, a roofer cleans and prepares the affected area, then uses controlled torching to reheat the seam and restore adhesion. The work must bond the separated edges without overheating or damaging the membrane. If the seam is badly deteriorated, the surrounding material is damaged, or moisture has spread, localized reheating may not resolve the problem. The roofer may need to remove compromised material and install compatible modified-bitumen components. Separated seams or perimeter joints may also require manufacturer-approved adhesive where suitable for the system.
Repair costs depend on the amount of seam involved, the condition of adjacent layers, access, and whether the underlying cause needs correction. A short, isolated separation with sound surrounding membrane involves a different scope from several open seams beside standing water. The estimate should explain which seams need repair and whether drains or runoff contribute to the problem. In Vancouver’s rainy climate, prompt attention helps limit water entry beneath the membrane. A clear repair plan connects the visible gap to the roofing system’s wider condition.
4. Torch-on roof leaks, wear, mould and algae
A leak signals that a waterproof membrane may have weakened, opened, or separated. In Vancouver, recurring rainfall keeps roof surfaces under pressure, especially around drains and low spots. On a flat roof, water can enter beneath a damaged area and travel before appearing indoors. A ceiling stain therefore doesn’t always identify the roof defect directly above it. Check several clues together: interior dampness, membrane cracks, worn granules, and persistent pooling.
Standing water deserves attention when it remains pooled more than 48 hours after rainfall. Clogged drains, debris, low spots, or changes in the roof surface can contribute to ponding. The cause should be identified before repairs begin. Clearing debris may restore water flow, while persistent pooling may require changes that improve runoff. Ponding keeps moisture against the membrane longer and adds weight to affected areas, increasing pressure on seams and worn sections. Those conditions can contribute to cracks or leaks.
Temperature fluctuations make roofing materials expand and contract. Over time, that movement can lead to cracks and splits in torch-on membranes. A small surface defect may admit moisture, while broader wear can weaken more of the roofing system. Inspect areas around drains, seams, and roof penetrations, then compare them with visible wear elsewhere. This helps distinguish a localized leak from repeated failures across the roof. Residential properties and commercial roofing systems both need attention to membrane condition and water movement.
Moss and algae can develop in damp, shaded roof areas. Their presence should prompt a closer look at drainage and membrane condition, rather than aggressive scraping. Roofing professionals can remove moss and algae with industry-approved cleaning solutions that avoid damaging the torch-on surface. A waterproof coating may improve resistance to moisture penetration, but it doesn’t correct a failed seam, blocked drain, or underlying damage. The repair plan should match the cause, not just cover a visible symptom.
Repair scope depends on the location and extent of wear, moisture beneath the membrane, and whether leaks keep returning. A small, isolated defect with sound surrounding material may call for localized work. Widespread damage, advanced wear, recurring leaks, or extensive moisture can require restoration or replacement instead of repeated small patches. Regular inspections help identify changes before they spread. In Vancouver, property owners can schedule an inspection in September or October before the heaviest rains, then clear rooftop debris monthly during fall. These checks can reveal pooling, algae growth, and fresh cracks while the roof remains accessible for assessment.
5. Assessing and repairing an existing torch-on roof
A sound repair starts with the whole roof, not just its most visible blister. On flat roofs, debris can block drains and hide cracks, while water may travel beneath the roofing membrane before appearing indoors. An assessment should map visible blisters, splits, lifted edges, seams, drains, and interior leak signs. It should also establish whether the surrounding surface is dry and firmly bonded. That picture helps distinguish an isolated defect from broader moisture or wear.
In Vancouver, permit requirements for torch-on roof repairs depend on the work’s scope. A localized membrane patch differs from work that changes the roof assembly or structure. Identify the proposed work clearly during planning, since the repair method and affected building components matter.
Repair methods should match the damage. A roofer must dry a blistered area completely before torching down a replacement piece of modified-bitumen membrane. Reinforced membrane patches can address localized blisters or bubbles, while a severe split may need a reinforced patch with modified-bitumen layers sealing its edges. A minor crack may be cleaned and repaired with a compatible torch-on method. Severe burn damage calls for removing the affected section and installing new membrane, rather than covering compromised material.
Standing water needs its own diagnosis before patching begins. Clogged drains, debris, low spots, improper installation, or structural deficiencies can contribute to ponding on flat roofs. The cause guides the repair: clearing a blocked drain differs from correcting a low area or damaged membrane. Water that remains pooled more than 48 hours after rainfall warrants attention. A patch alone won’t resolve a drainage problem that keeps wetting the same roof area.
Repeated small repairs may stop making sense if damage is widespread, leaks recur, the membrane is worn, or moisture extends beyond one section. In those cases, restoration or replacement may be more appropriate than another isolated patch. A useful assessment establishes the project scope before choosing a repair approach, then explains which defects need work and why. Homeowners shouldn’t attempt torch repairs themselves: propane torches create serious fire hazards, and inexperienced heating can damage the membrane or leave weak seams. For a roof with blisters, leaks, or extensive wear, request an assessment of the roof’s condition.
Pro Torch Roofing: Torch-on Roofing
Pro Torch Roofing helps property owners in Vancouver, Burnaby, West Vancouver, and North Vancouver assess torch-on roof bubbles, leaks, loose seams, and worn membrane areas. An inspection can clarify whether localized roof repair suits the damage or broader work may be needed. By considering the visible defect alongside nearby seams, flashing, and drainage, the assessment connects the repair approach to the roof’s condition. This is useful when a bubble returns, a leak persists, or several areas show wear. For other roofing needs, Pro Torch Roofing also offers custom sheet metal, asphalt shingles, and cedar shakes. Contact Pro Torch Roofing to discuss your roof repair needs.
Choose a Clear Next Step for Your Roof
If you’re weighing torch-on roof bubbling repair in Vancouver, use the assessment to move from uncertainty to a defined repair plan. Knowing which work addresses the underlying roof condition helps you make a considered decision for your property, rather than treating a visible symptom alone. The repair price depends on the case and is provided after a quote request; the affected area, access, and repair method shape the scope.
Pro Torch Roofing offers torch-on roofing and roof repairs for properties with membrane concerns. Custom sheet metal and asphalt shingles are also available for other roofing needs. Share what you’ve noticed, such as a recurring bubble, an interior leak, or visible membrane wear, so the roof issue can be discussed in context.
Contact Pro Torch Roofing to discuss your roof and take the next step toward a practical repair plan.
Frequently Asked Questions
What affects torch-on roofing cost in Vancouver?
The repair price reflects the work required, not simply the visible defect’s size. A roofer considers the affected membrane area, access to the roof, the number of damaged layers, and whether drains, perimeter details, or penetrations need attention. For example, a patch beside a drain can involve different work from a defect in an open roof area. Pricing depends on the specific repair scope and is provided after a quote request.
What is an SBS torch-on roof?
An SBS torch-on roof uses modified bitumen membrane sheets bonded with heat. Pro Torch Roofing’s described 2-ply system has a reinforced base sheet and a cap sheet made with rubberized bitumen, fibreglass, and polyester. The material is flexible, strong, weather-resistant, puncture-resistant, and fire-resistant. Its reflective surface can help keep interiors cooler in summer. These features make the system a practical option for flat roofs in Vancouver and nearby communities.
What Do Blisters and Bubbles Mean?
Blisters and bubbles are raised areas where the roofing membrane has separated from the layer beneath. Trapped moisture or air can contribute, but the raised shape alone doesn’t reveal how far damage extends. A practical clue is whether nearby seams, drains, or roof details also show wear. Record the location from a safe vantage point and note any related indoor staining to help describe the issue during an assessment.
When Does the Roof Need More Than a Small Repair?
More extensive work may be needed when defects appear across several roof areas, leaks keep recurring, membrane wear is advanced, or moisture affects a broad section. For example, several separated seams combined with water-damaged material suggest a wider problem than one isolated puncture. A roof assessment should map visible defects and establish whether sound membrane remains around them. That distinction helps determine whether localized repairs can address the issue or broader restoration is appropriate.
What causes bubbles or blisters in torch-on roofing?
Bubbles form when air or moisture becomes trapped between roofing layers or when the membrane loses adhesion. Installation conditions, water entry, and damage to the roof surface can contribute. A puncture from equipment work, a dropped tool, or sharp debris can also create a path for moisture. The cause matters because patching the raised spot alone won’t correct a nearby water source or an underlying adhesion problem.
Can bubbled torch-on roofing be repaired, or does it need replacement?
A localized bubble can be repaired when the surrounding membrane remains sound and the affected area can be dried and properly patched. Replacement or broader restoration may be appropriate when deterioration is widespread, moisture extends beyond the bubble, or leaks continue across the roof. The decision rests on the membrane’s condition beyond the visible defect, not the bubble’s appearance alone. An assessment should identify affected and intact areas before determining the repair scope, a practice similarly recommended by residential re-roofing specialists like SW Roofing & Construction LLC when evaluating full replacements.
How do roofers repair bubbles in torch-on roofing step by step?
A roofer first examines the blister and surrounding membrane, then opens or removes compromised material as needed. The affected area must be dried completely before repair. Next, the roofer applies a compatible modified-bitumen piece or reinforced patch, heating and bonding it to the prepared surface. Finally, the repair edges and nearby membrane are checked for secure adhesion. The exact method depends on whether the blister concealed moisture or damaged underlying layers.
What does torch-on roof blister repair cost in Vancouver?
The price depends on the repair scope and is provided after a quote request. Relevant factors include the blister’s size, whether moisture lies beneath it, how much membrane must be removed, and access to the affected area. A single dry blister with sound surrounding material involves different work from several bubbles over damp or deteriorated layers. A written scope should clarify the repair method and the areas included, whether the property is in Vancouver or Burnaby.
